How to Install and Configure Max
Go to the “Products” or “Support” section of the www.cycling74.com website and download the latest version of MaxMSP for your platform (Window or Mac).
Launch the program to start the installation process. This will create a new folder containing the MaxMSP application on your computer’s hard drive. We would recommend that you neither rename nor move this folder.
The first time that you install MaxMSP on your computer, the program will be in “demo mode” and fully functional for 30 days. After 30 days, a valid license for the software will be needed to run the program, which can be purchased from Cycling 74.
In the Max folder, you will find various sub-folders as well as two applications: MaxMSP and MaxMSP Runtime. The first application, MaxMSP, is the one in which we are interested in using. For the curious, the second program allows you to run Max programs (patches), but does not enable modification of those patches.
Configuring your audio interface
When you have started up the MaxMSP application, select Audiotester from the Extras menu, which should cause the following window to appear:
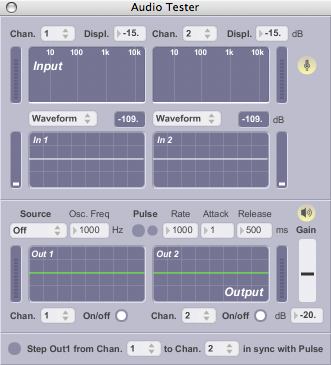
In the lower half of the window, on the left side, there is a pop-up menu under the word Source which contains the word Off. Change this to Oscillator using the mouse. You should now hear a sound, whose volume can be changed by sliding the small horizontal line that can be found on the right side of the window under the word Gain up or down. To turn the sound off, reset the Source menu on the left to Off once again.
If you do not hear a sound, select the Dsp Status item from the Options menu, which should bring up the following window:
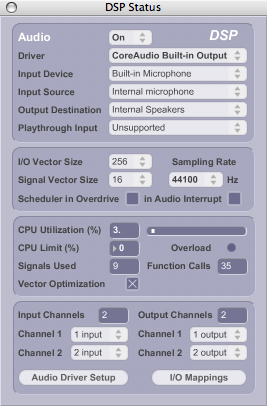
Take a look at the menus in the uppermost part of the window ‒ the second menu, next to the word Driver, allows you to set the audio interface (internal or external) that MaxMSP will use.
The other aspects of this window we cover in the book, in the section called Installing the Virtual Sound Macros library.
The Virtual Sound Macros library is an extension of MaxMSP created especially for this book, and is essential for making the examples operate correctly.
1. Download the contents of the library from www.virtual-sound.com/cmsupport.
2. After decompressing the file, open the “virtualsound macros” folder.
3. Within this folder you will find a folder entitled “put in init”: the CONTENTS of this folder (not the folder itself!) should be put into the “init” folder used by MaxMSP, which can be found, in turn, in the “Cycling’74” subfolder of the “Max5” folder, which is the folder that contains the MaxMSP application.
4. Now create a new folder to hold the library, or choose an existing folder that you already use to hold programming libraries. This folder can be located wherever you’d like it to be, perhaps in your Documents folder or in a folder that you use for musical or programming projects. We do, however, recommend that you avoid placing it in Max’ application folder (“Max5”). Remember the name and path that you choose, because we will use it shortly.
5. Put the “virtualsound macros” folder into your newly created folder.
6. In MaxMSP, use the File Preferences item in the Options menu to bring up this window:
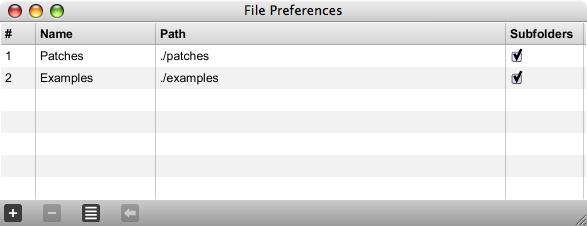
7. Click on the ‘+’ that you see in the lower left corner of the window, which will cause a new entry to appear in the list (probably with the name “userpath_3”).
8. Click on the Choose button found in the Path column for this new row (which will probably be the third row). A window will appear in which you can select a folder – find the library folder that you created in step 4, select it, and select Choose. (Do you remember how you named it and where it is located?) CAUTION: After you have made this selection, you cannot rename or move the folder. Because of this, you should make sure that you’ve put it in a good spot and given it a meaningful name: see step 4.
9. At this point, the library is installed. After you make sure that the checkbox associated with the row for the new library is checked (see the first two rows for guidance), you may close the “File Preferences” window and use the library.